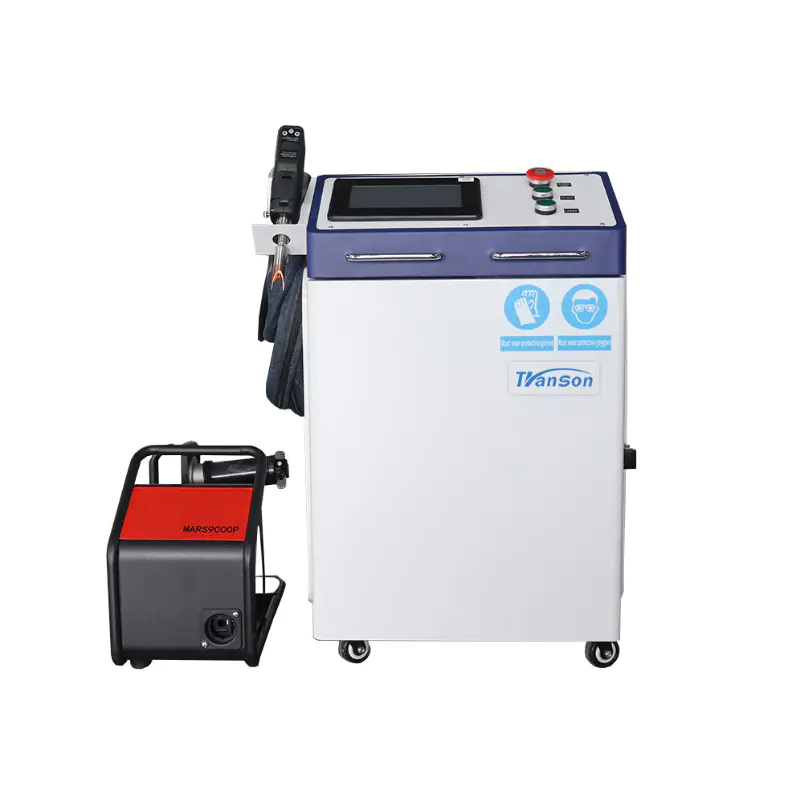
Advertising CNC Router Machine For Metal Wood MDF PVC Engrave
Enclosed Type
Build Laser Cutter
by:Transon
2020-12-07
It\'s a very interesting project if you have a lot of time and love to build everything and not just go to the store to buy it.
This guide will show you how to make a CO2 laser cutting machine with a cutting bed size of 38X17X10.
About 1200-
1500 made in writing.
Video of the system cutting cardboard: I apologize in advance, this is my first note, I am not the best writer.
The first thing to know about making laser cutting machines is that it is a very time-consuming, dangerous and difficult process.
You shouldn\'t work alone.
If you hurt yourself, you need help from people around you.
This is a very real problem.
Things to know when using a laser: * death: voltage up to 50000 V and current up to 100 ma.
This will kill you right away.
* Blindness: the laser used here can damage your vision before your brain realizes there is a problem.
* Fire: the laser used here can ignite the object without your knowledge through the reflection of the beam.
Whenever the laser system is powered on: * you and others should wear eye protection * doors and windows should be closed * Make sure there is enough distance between you and the high voltage terminals from human eyes
Considering that this light cannot be seen, it is difficult to judge the direction of the beam.
Polycarbonate absorbs infrared rays very well.
I suggest you go to Home Depot to buy some transparent polycarbonate safety glasses.
Do not launch laser irresponsibly.
Now that we have done all the safety work, I have a disclaimer: I highly recommend that you do not make laser cutting machines.
Cheap Chinese laser cutting machines can be purchased on eBay with similar accuracy for less than $1000.
I know that most Chinese laser cutting machines do not work properly when they are delivered, but with a little repair, they can work as well as the lasers I am going to describe, work much less, and finance investment is similar.
The most commonly used type of laser in laser cutting is CO2 laser.
CO2 laser excited CO2 (
With other gases)
In the 12000 tube-24000 volts.
When the gas is excited, it produces infrared rays that reflect back and forth between full reflection and some mirrors.
When there is enough infrared rays that exceed the reflectivity of some mirrors, the infrared rays leave the laser tube through some mirrors.
The infrared rays emitted from the tube are directed to other full mirrors to shine the light to the surface you want to cut.
Once the light is in the right position, it is necessary to focus the light to a point using a focused optics.
The focus of this object is the object you want to cut.
At the beginning of this project, I was interested in making laser tubes from scratch, but I found that lasers that can be made at home are not very reliable, although they are expensive to operate.
I managed to find a sealed 40 W laser tube from someone on eBay for $300 with power.
Some say it\'s cheating. oh well.
Essential Tools * hand drill * Hacksaw * hair dryer/hot gun * Drilling Machine * table saw * reel saw * propane torch * Palm Sander * soldering iron * screwdriver * Allen wrench * wire cutters with 6/32 and 8/32 /peeling machine built-in * #6 Acrylic drill * #8 ordinary drill * 1/2 acrylic drill * 1/2 ordinary drill * 6/32 tap * 8/32 tap * 1/2 tap * npt tap cost * laser and Power $300-
$600 * plywood $150 * aluminum $40 * hobby CNC Pro $90 * solenoid $20 * blower $93 * roller blade bearing $12 * sliding door bearing $34 * Straight Line 83 * belt and pulley 60 91 * optics $ * month * thread hose $ Month * solid stick $6-October * polycarbonate stick $ * acrylic month * hinge month * all kinds of accessories $100 total: $1205-
Material housing for $1505: * 2 52 3/8X16 X plywood on the front and back. Home Depot.
* 2 27X16 X plywood on both sides. Home Depot.
* 2 sheets of plywood with 52 3/8X26 X plywood for the bottom and CNC workbench. Home Depot.
* 1 30X9 X plywood for front door. Home Depot.
* 2 26X2 X plywood for main entrance door guide. Home Depot.
* 1 polycarbonate with 48X29X3/16 (maybe acrylic? )for top cover.
Freeman plastic.
* 2 door hinges.
Carpentry and hardware.
* Drywall screws. Home Depot.
* 1 piece 4 inch 200 duct pipe fan.
EBay: Tjernlund M4.
* 1 piece 4 inch 25 feet flex dryer pipe. Home Depot. Motion table (X and Y)
: * 1 piece 50X2x2 aluminum horn iron. Home Depot.
* 2 pieces 22 7/8X2x2 aluminum horn iron. Home Depot.
* 1 large stepping motor.
Chip HP LaserJet II.
* 1 small stepping motor. Scrap Epson FX-
880 point matrix printer.
* 4 pieces of linear bearing for cash register. EBay: FBW2560.
* 9 pieces of 3/16 nylon/steel sliding door ball bearing.
Slide out of any well-stocked local hardware store in the drawer.
* 2 pieces of 6 feet X 3/16 solid steel rod.
Local hardware store.
Home Depot is only 3 feet long.
* 3 feet X #8 rebar 2 pieces. Home Depot. * 1 long belt.
Stockdrive/sdp-si. com: A 6R 3-450037.
* 2 short belts.
Stockdrive/sdp-si. com: A 6R 3-225037. * 4 pulleys.
Stockdrive/sdp-si.
Com: a 6Z 3M12DF09505.
* 1 amateur CNC of any model. hobbycnc. com.
* Hobby CNC 1 power supply.
Need to be able to provide about 5 amps at 18-hour24 volts.
Old inkjet printer
* 2 optical limit switches.
Hp LaserJet II/old printer.
* 1 welded breadboard. Radio Shack.
* 5 small pnp transistors (2N3904). RadioShack.
* 1 large pnp transistor (TIP122). RadioShack.
* 5 1/4 W 1 k resistors. RadioShack.
* 2 switches for door indicator. RadioShack.
* 1 medium power diode (1n4007). RadioShack.
* 3 pieces of 5/16 Fender gasket. Home Depot.
Floating table (Z)
: * 1 44X22 X plywood for the laser table. Home Depot.
* 8 pieces 5/16 ball bearings. Sports store.
Roller Blade bearings are required.
* 1 feet threaded rods 4 5/16 pieces. Home Depot.
* 12 feet ball style fixture/fan zipper. Home Depot.
* 8 pieces of Fender gasket 5/16. Home Depot.
* 3/16 sheet board * aluminum foil. Grocery Store.
Mirror and optics: * 1 old hard drive that you don\'t care about. Junk bin.
* 2 pieces 2x2 aluminum horn iron. Home Depot.
* 1 5/16 Fender washer. Home Depot.
* 4 pieces of 1 inch #8 aluminum thumb screws.
Local hardware store.
* Medium strength Spring 4 pieces 1 inch.
Local hardware store.
* Powerful magnet.
Old hard drive or trash can.
* Rubber cement.
Home Depot * 1 20mm-inch 55mm-inch focal-point ZnSe lens. EBay.
* 3/16 acrylic sheet laser: 1 piece of 40 W or larger Chinese laser tube. EBay.
A 40-watt or larger Chinese laser power supply. EBay.
3 feet high voltage line.
There may be power.
Crt TV or monitor.
Month shovel terminal. Home Depot.
1 aquarium water pump 1200 GPH. Pet co.
20 feet 1/2 OD vinyl hose. Home Depot.
1 piece 3x3/16 hard aquarium air line. Pet co.
1 piece half inch 90 degree threaded to polyethylene fitting.
Home Depot in the pipe part of the small white bag.
2 Clic pipe clamps with correct diameter to fit around the laser tube.
I do not list the dimensions as the diameter of the laser tube varies from supplier to supplier.
Plumbing Supply House.
2 carriage bolts.
Local hardware store.
1 solenoid capable of handling 10 PSI air pressure.
Various: * Many 5/16 #10 #8 #6 nuts, bolts, lock washers, washers and a variety of other hardware.
Too many are listed separately.
* Computers built into parallel ports on the motherboard, Windows XP SP2, Pentium 3 1.
2 gb ram or better 0 ghz or better.
* Solution Stan Linkmotion virtual CO2 laser controller software.
Start when get a 8 feet of 2 inch aluminum angle iron with chop saw or hack saw will its cutting into 50 inch.
Cut off a section of 1 inch on one side of the horn end.
Do the same cut on the other end of the other horn.
This will leave you a 48 inch long horn face and another 50 inch long face.
These cuts will allow the belt to be passed on the left and right sides.
Mark the inside of the 50 inch face as 25 inch (center)
With permanent mark.
Take the rest of 8 feet pieces of angle iron and cut it into 2 pieces of 22 7/8 inch.
Find the center of these two parts.
With a permanent mark, mark the inner surface of the two blocks at 11 7/16 (center).
Adopt a linear bearing track assembly and remove the block cover on one side.
Remove 1 linear bearing.
Now there should be 2 linear bearings on the linear bearing track.
Replace the block cover.
Repeat this for another linear bearing track assembly.
Place the modified linear bearing track on 22 7/8 pieces.
Align the center mounting holes with the 11 7/16 mark you made on the 22 7/8 aluminum horn.
Make sure that the linear bearing can slide the entire length of the track at 1/16 clearance in all positions.
The linear bearing assembly must be straight on the aluminum horn.
Mark all mounting holes on the linear bearing to the aluminum horn with a permanent mark.
Remove the linear bearing assembly using a power drill or drill bit and drill out the mounting hole with the appropriate size drill bit.
7/8 other duplicates.
Take the remaining two linear bearing track assemblies and remove the block cap from both.
Remove all linear bearings from one of the tracks and remove 1 from the other.
Now, there should be two linear bearings on one of the tracks, and there should be no on the other.
Do not reinstall the blocking cap.
Place two linear bearing rails on a long surface of 50 inch aluminum horn iron.
Make sure that neither side of the linear bearing track is blocked and there is absolutely no gap between them.
Align the two tracks so that the face meets at the mark you draw on the aluminum horn.
Make sure you can slide the linear bearing from track to track with very little resistance.
Make sure that there is a 1/16 inch gap between the linear bearing block and the aluminum angular iron wall in all positions on both tracks.
On the angle iron, the track must be completely straight, otherwise the laser cutter will not be cut straight.
Mark all mounting holes on the linear bearing track as aluminum horn.
Drill out all mounting holes with a suitable size drill.
In addition to the mounting surface, cover the stepping motor large and small with masking tape.
Make sure to cover any holes that allow anything to enter the stepping motor, even on the mounting surface.
Ensure the bearing is fully protected.
Spray the mounting surface with black paint.
Immediately push a piece of white print paper onto the mounting surface of the motor.
This will punch holes in the paper, and now the painting of the motor will be transferred to the paper to give you an installation template.
Clean the paint with acetone applied to the paper towel.
Do not pour alcohol on the motor as it will peel off the oil from the bearing.
Do not disassemble the stepping motor for any reason.
The alignment of the motor is defined in the factory, and it is difficult if it is not impossible to recover at home.
Make sure the newly created template is dry.
Take 50 inch pieces of aluminum angle iron to rotate, so that when 50 inch faces are perpendicular to the workbench, 48 inch faces are flat on the workbench.
Paste the small motor template to the outer surface of the upper left corner of the angle iron using packaging or transparent tape.
Drill out all the mounting holes and the holes of the broken pole.
Small motor installation (
May use screws used when previously installing the motor)
Install the pulley on the stepping motor.
Wrap the long belt around the motor pulley.
Take another pulley and tighten the belt with the pulley in your hand.
Use your eyes, with respect to the aluminum horn, to make the belt as straight as possible.
Click the pencil with a greatly extended graphite to mark the position of the center pulley in your hand on the aluminum horn.
Remove the belt and pulley in your hand.
Measure the height of the Mark relative to the height of the pulley mounted on the motor.
Please correct your mark if necessary.
Move the Mark 1/16 1/16 off the motor pulley.
Drill 3/16 holes on the mark.
Sliding the head by the unloaded pulley has a #10 bolt near a large smooth part.
Install the nut on the bolt and tighten the nut until about 1/32 nd from the pulley.
Reinstall the belt and tighten the belt with the pulley that now has the bolt through.
Pass the bolts through the newly drilled holes in the aluminum horn.
The belt should be very tight and it should be a bit difficult to install the bolts.
Install lock washers on bolts and nuts.
Tighten the nut and make sure not to tighten the nut on the other side of the aluminum horn iron as this will lock the pulley.
Place two unblocked linear bearing tracks on the inside of the 50 inch face.
Slide bolts 8 through all holes.
Install #8 lock washers and nuts on the back. Do not tighten.
Align the track to ensure that the inch gap between the linear bearing block and the aluminum Horn in all positions is 1/16.
Make sure the track is completely straight. Tighten bolts.
The bearing blocks should be easy to slide and there is little friction between the tracks.
Take a 22 7/8 horn and place the mounting hole on the workbench.
Tape the large motor template to the upper left corner of the aluminum horn.
Drill out the mounting hole and the power rod removal hole.
Installation of large motor (
May use screws used when previously installing the motor).
Install the pulley on the stepping motor.
Wrap the long belt around the motor pulley.
Take another pulley and tighten the belt with the pulley in your hand.
Use your eyes, with respect to the aluminum horn, to make the belt as straight as possible.
Click the pencil with a greatly extended graphite to mark the position of the center pulley in your hand on the aluminum horn.
Remove the belt and pulley in your hand.
Measure the height of the Mark relative to the height of the pulley mounted on the motor.
Please correct your mark if necessary.
Drill a hole in the mark in half an inch.
Place the linear bearing track on the internal mounting full surface of 22 7/8 pieces of aluminum horn with motor installed.
Pass #8 bolts through every other mounting hole, leaving half of the holes unoccupied.
Align the track to ensure that the inch gap between the linear bearing block and the aluminum Horn in all positions is 1/16.
Make sure the track is completely straight. Tighten bolts.
7/8 other duplicates.
Flip the 50 inch aluminum horn so the mounting nut for the track is now facing the ceiling.
Install aluminum horn on the vice.
Mark the center at both ends of the aluminum horn.
Take 2 ununloaded linear bearings and place the two linear bearings face down on one side of the 50 inch aluminum horn.
Center the two sides of the linear bearing to the center line you draw.
The bearing block should be oriented, so the short side contact.
Rinse the edge of the bearing block with the edge of the aluminum horn.
This should form a T-shape.
The bearing block shall be perpendicular to the length of the aluminum horn.
While keeping the bearing block in line with the aluminum Horn, Mark 4 screw holes (
2 pieces per bearing)
On the aluminum horn.
Remove the bearing block.
Drill out the mark with the right size drill.
Repeat for the other side of the 50 inch aluminum horn.
Twist the 50 inch aluminum Horn to the bearing block and screw it to 22 7/8 aluminum horn.
Use linear bearing blocks on both sides.
When used separately, the linear bearing has a large slope.
It seems that using 2 can solve most tolerance problems.
Big and Small stepping motors should all be on your left side.
You should have a very large sliding device now.
Cut all wood into the dimensions listed in the material manufacturing.
Take a plywood 52 3/8X26 X and cut a hole 41X17 on it.
Let\'s call the longest side closest to you the front.
The edge of the hole is located from the front at 4 ° and 4 ° from the right.
I made this hole by placing plywood on the table saw with the down blade.
I started the table saw with the paper above the dropped blade and raised the blade to the maximum height and passed through the board.
Keep in mind that the saw will want to throw the wood when you pull the wood back through the saw.
Also keep in mind that the bench blade is a circle, so the bottom of the cut is always wider than the top, so do not finish the cut with the bench blade.
Finish them with a handsaw or reel saw and smooth with a palm sander.
Place the large sliding device on plywood with newly created holes.
The motor should be on the left.
22 7/8 the bottom of the aluminum Horn has a nut, so it should not sit flat.
Align the right 22 7/8 aluminum Horn to the right bottom.
Push two 22 7/8 rails hard and create dents on the wood with nuts.
Remove large sliding units.
Drill out all dents in the wood with a bit wider than the nut used to fix the linear bearing track.
Put the sliding device back on the wood.
Make sure the right aluminum horn is square and flush with the right and bottom sides of the plywood.
Pass the screw through all the unoccupied holes in the right corner iron.
Make sure the left Angel iron side is parallel to the right Angel iron side.
This needs to be perfect, otherwise the 50 inch aluminum Horn will not slide freely.
Twist the left corner iron.
From now on, the assembly of this aluminum angle iron, linear bearing, belt and plywood will be called XY table, take 44X22 X plywood and mark the center of the side around.
Draw a cross on plywood.
Find the center of the hole in the XY table.
Mark the center on all sides of the hole.
Place the smaller plywood under the XY table.
Mark the wood line from the bottom to the top.
Put two drywall screws through the wood at the top, on the Bottom Wood at any position, and fix the two pieces of wood together.
Place other unmodified 52 3/8X26 X plywood under these two sheets.
Align the bottom paper with the top paper.
It needs to be perfect.
Screw the drywall screw through the middle sheet into the bottom sheet.
Now, all the wood should be clipped together, locked together and played in no direction.
If there is play, put more drywall screws on the moving wood.
Measure 10 inch from left to right from the lower left to the big hole.
Measured 2 inch from this point. Draw a dot.
Now measure from the lower right corner, starting from 10 inch on the right.
Measured 2 inch from this point. Draw a dot.
In addition to measuring up rather than down, do the same for the top.
You should now have 4 marks on the top of the wood.
Trace through all 3 pieces of wood with 3/16 bit.
When you drill, you have to drill completely perpendicular to the top surface, which means that the drill must go straight down in any direction, with no angle except through the wood.
If you do something wrong, the floating table does not float up and down.
Remove all drywall screws and separate all 3 pieces of wood.
When you separate the wood, mark the relationship between the wood.
This is not necessarily accurate.
You just need to know what the direction and sides of each shard are.
Use the same drill diameter as the threaded blade and drill all 3/16 holes in the middle sheet to that size.
Insert the hammer in the 4 threaded plug-ins into the newly widened hole, remove 5/16 bearings, and find a Wood Hole saw that closely matches the outer diameter of the 5/16 bearings.
On the top of the wood drill, pass through the wood in the existing 3/16 hole.
It is very important not to drill all the way to the wood as the wood will be used to support the bearing.
Use a flat head screwdriver to peel out the wood worn by the hole saw.
Drill out the center of the remaining 3/16 holes so that it is larger than 5/16 nuts in size.
Do this for all holes on top and bottom paper.
Take a plywood of 52 3/8X16 X Velcro and cut a hole of 26X7.
This hole is centered on the long axis, 2 inch from the edge of the short axis.
Use the above method for cutting the XY workbench.
Now, this paper is considered to be the front of the laser housing.
Unmodified Paper will be treated as using drywall screws to connect the boards at the bottom to the front, back and right.
The paper at the bottom is between the sides.
The paper at the bottom is not lower than the side.
You should now have a box with no left or top.
Do everything well and keep it clean.
Take a 12 inch 5/16 threaded rod and thread on about 1 inch of the nut.
Put a 5/16 bearing on the side you just threaded.
Thread on another nut, clip the bearing between the nut.
The bottom nut should make the bottom of the screw bar flush with the nut.
Tighten both nuts.
Repeat this operation for the other 3 rebar bars.
Screw the rod into the bottom (
The side where you knocked the plugin in)
Wood with 4 inch threaded plug-in installed.
Throughout the assembly, flip it so that the bearing faces the floor and places it on the top of the base block of wood in the same direction as when drilling through all the plates.
Align the bearings so that they fall into the widened holes.
You now have a floating table that can be lifted and lifted by rotating the screw bar.
All rebar bars should rotate freely, place the XY workbench on top of the floating workbench, and remember to keep all directions the same as when drilling through all planks.
Adjust the screw bar to adjust the height of the XY workbench, so the XY Workbench is 4 inch from the top of all sides.
Make sure this is perfect in all aspects.
Don\'t hesitate to measure this many times.
Place the aluminum code bar or any other long straight items that are guaranteed on the XY table.
Make sure the table is flat in all directions.
If the XY table is twisted, install 2 screws perpendicular to the XY table bending through the side of the shell.
Twist the XY Workbench straight using a screw bar.
The XY table must be straight, otherwise you will not be able to align the beam at all positions with the laser head.
Once you straighten the table, install many drywall screws from the outside of the shell to the XY table.
Rotate the floating table down by rotating the screw bar.
Remove the right side.
The structure is a bit unstable now, so be careful.
Use a large stepping motor mounted on the left aluminum Horn to measure the position of the Velcro hole.
Drill the same hole on the right aluminum horn.
Take a solid rod of 6 feet 3/16 and pass through the hole halfway through the shell.
Slide the bearing, pulley, 3 bearings, pulley and another bearing on the rod.
All pulley fixing screws should face the table and all bearings are white nylon type with an inner diameter of 3/16.
Slide the short belt over the rod and pass the solid rod through the hole on the other side of the XY workbench.
Slide the belt on the left side of the two motors.
Remove the pulley on the large stepping motor.
Put it in the vise and drill a 1/8 hole completely from the sprocket part of the pulley edge 3/32.
Tap on both sides of the pulley using a 6/32 tap.
Reinstall the pulley on the stepping motor.
Place the left Belt on the front and back pulleys.
It should be very loose.
Measure the position of the pulley on the large stepping motor relative to the housing.
Mirror this measurement to the relative aluminum horn.
Drill another half-inch hole in that place.
Remove another 6 feet 3/16 solid rod from this hole and push its part into the shell.
Slide the right belt, bearing, remaining pulley and two remaining 3/16 nylon steel bearings.
Push the rod all the way into the end of the pulley on the large stepping motor.
Install 2 short 6/32 Allen wrench fixing screws on the pulley.
Install the belt on the right pulley.
The belt should be loose.
Cut 6 pieces of #8 rebar to 5 inch and 2 pieces to 11 inch.
Thread nut 3 makes both sides of each new short Bar turn.
Take a 1/2 hex socket for driving hex bolts and nuts and install it in the vise.
When placing both nuts on the threaded rod, heat the rod to cherry red using your favorite propane/map gas torch.
When the rod reaches the temperature, visually place the rod behind the socket and pull it towards you to form a ring in the rod.
Immediately immerse the rod in a bucket of water and cool it and temper it.
Dry the rod and clean any sheet of metal on it.
Each loop will hold 1 bearing on the outer shell.
There are two bearings around each pulley, and there is no gap between the bearing and the pulley.
For stability, each solid rod has 1 bearing in the center of the rod.
The front center rebar passes through the front wall.
The rear center bearing passes through the XY workbench.
Since the laser tube will be installed there, it cannot go through the back wall.
The outermost bearing is rinsed with aluminum horn.
Slide the threaded rod rings over each bearing and mark their position on the wall of the housing.
Remove the ring and drill holes in the housing.
Slide the ring back onto the bearing and through the wall.
Install washers and steel/nylon lock nuts at the end of each loop.
Adjust the front solid bar to make the inch bar stand out from the aluminum horn on the left side.
Tighten all fixing screws on all pulleys.
Tighten each ring until the professor belt.
Cut all the solid bars to flush with the aluminum horn iron on the right.
Install left and right.
In my case, the large stepping motor is too big to be installed.
If the stepping motor is not suitable, cut a hole on the left side.
Take out your favorite old junk hard drive.
Remove the lid and remove the plate.
Place the plates on a very clean and soft surface to prevent them from scratching.
Cover all plates completely with masking tape.
Clip a plate onto the drill press and a piece of wood between the table and the plate.
Remove the centering bit from the 1-inch hole saw and install it in the drilling machine.
Cut the disc slowly, make sure not to press hard, because this can distort the disc when you cut it.
Spend your time here. It’s worth it.
Cut at least 3 mirrors.
I took 4 from one plate.
Take the tape on one side of each mirror and look through the mirror at a straight edge.
Look for any exceptions in the image of the edge of the line.
Throw the mirror away if you see any slight mistakes.
Put the new masking tape back on the surface of the mirror to prevent damage.
Keep in mind that these mirrors are not as good at reflecting inferred light as the real mirrors purchased for this purpose, but they are indeed free.
I guess they transmit 95% of the light because they don\'t get hot in the run.
Cut a 2 inch aluminum Horn 2 inch long.
Take a Fender washing machine a little wider than the newly cut mirror and place it on the outer surface of the newly cut angle iron.
Trace the edge of the gasket to the angle iron.
Draw a cross center through a newly tracked circle.
At each intersection of the circle and cross, drill a 1/8 hole in the tracked circle.
Tap each hole with a tap of 8/32.
Screw an aluminum thumb screw with a spring on it into each hole.
Remove the tape from one side of the mirror and stick the mirror to the Fender gasket with rubber cement.
Stick a powerful magnet to the back of the angle iron and put the washing machine/mirror combination on the front.
The magnet holds the washing machine/mirror combination in place.
Drill 2 small holes on the base of the new frame.
You can adjust the mirror with thumb screws.
Take an aluminum horn of at least 3 inch long.
Cut one side at 45 degrees.
I cut this on the saw, but you can do this with the saw.
Once this cut is done, measure the face facing your body and make a mark at 3 inch.
Cut parallel to the mark of the previous cut.
Take the other mirror, remove the masking tape and stick it to the outside of the angle iron.
Print out the included dxf file on a blank sheet of paper and cut the laser head and various parts with scissors.
Stick the paper to a piece of 3/16 acrylic resin with tape.
Use a reel saw to cut the pieces out.
Drill the hole out using acrylic drill bit with drilling machine.
The average drill bit will crack the acrylic.
One of the smaller of the two large holes needs to be tapped with a pipe tap, and one inch 90 degree polyethylene adapter needs a threaded insert.
The four holes around the largest hole need to be excavated with a 6/32 tap.
The oblique edges of both triangles need to be drilled, and each triangle needs to drill 2 holes per inch from each angle.
The bottom of each 90 degree triangle needs drilling and digging. Use a 6/32 tap.
Use 4 6/32 screws to connect the plastic with 4 small holes to the oblique edge of the triangle.
Stick the other mirror to the inner surface of this piece.
The hole at the bottom of this now created mirror bracket can be fixed to the laser head platform through the slot on the head platform.
If you can\'t cut out the slot on the laser head platform, don\'t worry, you can replace this slot with a lot of screw holes.
The mirror can be adjusted by screws at the bottom.
The lens is fixed by a square with a large circle and 4 small holes around it.
Flip the laser head platform and turn the shiny side up the ZnSe lens (
Or face down when connecting to the XY table).
Place the lens holder on the lens and attach 4 screws of 6/32.
Tighten them carefully in turn with moderate pressure to make sure you don\'t break the lens.
Don\'t touch the lens with your hands.
Toxic.
Install the laser head on two linear bearing blocks on the 50 inch aluminum horn.
Please note that this head is cut by a laser cutter and you can cut out a better head when you really get the laser to work.
Gently install these two batteries on the laser tube and slide them to a reasonable position on the tube.
Place the laser tube on the back of the housing and center it in the housing.
Move the laser tube from the back as much as possible while keeping the gap between the laser tube and the center rod bearing at least 3/16.
Make sure the laser is parallel to the back of the housing.
Outline the basis of clics with a pencil.
Remove the clics from the laser tube and place the tube in a safe position.
Align the clics with the profile and mark the holes at the bottom of the clic to the XY table with a greatly extended click pencil.
Remove the clics from the XY table and drill out the mark with an inch bit.
Insert the appropriate diameter bracket bolt through clics.
Install clics back to the laser tube.
Rotate clics to make the right water connection face the ceiling.
Place the laser tube on the XY workbench and the support bolt through the XY workbench.
The output of the laser should face the left side of the housing.
Measure the height of the center of the laser head mirror relative to the XY table (
Not floating table).
Measure the height of the output center of the laser tube.
If the output of the laser tube is lower than the center of the mirror, please add the Fender gasket under clics.
If the output of the laser tube is higher than the tube, remove clics from the tube and polish them down with a Palm Sander and coarse sand sandpaper.
When the appropriate height of the tube is reached, place the Fender washer, lock washer and nut on each transport bolt under the XY table. Do not tighten.
Straighten the laser tube with the back wall to make sure it is parallel.
Tighten the nut on the carriage bolts.
Drill holes from the back of the housing, allowing penetration of laser tube high voltage lines, laser tube grounding, large stepping motors, small stepping motors, X limit switches, Y limit switches, 3 door switches, air supply hoses and 2 water hoses.
If the laser tube manages to disconnect from the ground or the high voltage line, or manages to leak all the gas contained, the high voltage line will arc to the ground at some point.
In order to protect itself, when it all happens, it will in some way be because the final laser tube is free of gas, the line that keeps at least 6 inch away from other wires, hoses, A sheet of metal or something else that conducts electricity.
Maintain close connection between pipe grounding and high voltage line.
Let these two wires penetrate the shell of the same hole and wrap them in aluminum foil where they penetrate the shell to prevent an arc from happening at this time.
Considering that the water channel is close to the high voltage terminals in the tube, please keep the water line isolated from other electrical connections including the high voltage line.
Enter the high voltage and ground wire into the housing through the same hole.
Weld on the spade terminals on both wires.
Be sure to use a large amount of solder on the high voltage forklift terminals to reduce corona discharge and arc hazards.
Squeeze the two terminals slightly with a pair of pliers to reduce the diameter of the shovel terminal loop.
Pack two terminals with a large amount of tape, excluding the front of the connector.
Please note that the rated voltage of each pack of electrical tape is 600 V.
Push-In connector on electrical connection of laser tube.
The connector should be quite comfortable.
If not, disconnect the spade connector with pliers and squeeze again.
Do not Weld to the tube.
Not only does this make it difficult to replace the tube, but you have the risk of breaking the Tube, because when you heat the tube with an iron, the glass on the tube expands evenly.
Connect the high voltage and ground wire to the power supply.
Connect the button to the 10 feet wire and connect it to the laser power supply control terminal.
Each laser power supply is different, so please refer to your laser power supply manual to find out how to do this.
You will use this button as your hand shot button.
Connect the water line to the laser tube.
Connect the water line connected to the pipe output to the pump.
Fill the 5 gallon bucket with water.
Put both the pump and the water pipe that is not connected in the bucket.
Plug in the pump.
Wear safety glasses.
Place a small piece of plywood in front of the laser tube and the edges flush with the back wall of the housing.
Make sure you don\'t push the fire button.
Plug in the laser power supply.
Simply press the fire button.
The wood should burn immediately.
Don\'t move this piece of wood.
Use a mirror with a thumb screw to mount the mirror behind a block of wood of about 45 degrees.
If the frame is too short, cut a small piece of wood and place it under the frame.
Fix the mirror on the table using drywall screws.
In order to get the right alignment, you may need to move this mirror multiple times, and you can fix the orientation of the mirror with your thumb screws, so don\'t put too much effort into the initial position of the installation.
Using a large wood clip, clip the other frame to the front of the left straight bearing block.
Use the thumb screw to move the block of wood you just shot with a laser to the front of the mirror holder.
Keep the block fairly close to prevent deviation from the beam.
Simple laser emission.
Adjust the mirror with thumb screws to bring the beam close to the other mirror.
Push the 50 inch aluminum horn all the way to the front of the shell.
Place the block at the end of the linear bearing closest to the large stepping motor.
Simple laser emission.
Move the beam block to the front of the linear bearing and transmit the laser briefly.
Adjust the mirror so that the beam shines in the same position.
Perform the same procedure on another axis until you can send the beam to the laser head.
Because the y axis mirror is fixed up and down, you may have to bend the angle iron to get the beam in the laser head.
You may also have to trim the mirror holder with a saw to put it in the right position.
Once you place the y-axis mirror in about the right position, remove the clip, place the unloaded bearing block upside down on the mirror holder and mark the screw hole.
Remove the frame, drill holes, install the frame on the y-axis bearing seat.
Take 3 Fender washers and drill 1 small hole from the edge of the washer.
Remove 1 screw from each linear bearing assembly.
Install the screws through the gasket hole you just drilled.
Install the washer/screw assembly back onto the bearing block in order to clamp the belt between the washer and the bearing block.
Weld your hobby CNC.
Do not install the z-axis stepping motor driver as the z-axis is driven with a manual laser cutter.
Connect the Hobby CNC to the stepping motor as instructed in the manual.
Set your hobby CNC to 4 steps per step.
If you have extracted a large stepping motor from HP LaserJet II, find two optical limit switches inside the printer and remove them from the pcb.
If you do not disassemble the HP LaserJet II, the optical limit switch must be found to have the XY homing function.
This is not a must, but sometimes it is very useful.
Weld the optical limit switch to the welded bread plate.
Follow the included schematic diagram and build the limit switch circuit.
Connect the limit switch to the Hobby CNC.
If you are using a 4-axis hobby CNC, please loop the left side of the resistor R13 on the PCB and weld it in place.
This wire can be used as a 5 V power supply for limit switches.
Build the laser drive according to the included schematic.
Connect the laser driver to pin 14 on the Hobby CNC.
Connect the laser with your flip machine.
Build the solenoid controller according to the included schematic.
Connect the controller to pin 16 on the Hobby CNC.
If you are using a 24 volt solenoid, you can use the 24 volt fan output on the Hobby CNC as a power supply for the solenoid.
Connect the solenoid to a convenient location.
Take a 3/16 hard aquarium tube and cut it into 3 inch.
Heat it up at a height with a hair dryer.
Bend the 45 degree arc from one end of the pipe 1 inch.
In order for the airflow to be hot enough to bend the pipe, you may have to slightly limit the airflow through the hairdryer.
Calm the airline.
Plug the airline\'s parts to the polyethylene bottom of the threaded adapter installed on the laser head.
It should fit well.
If not, please wrap some tape around the pipe and try again.
Rotate the airline to make it about the place where the materials are cut facing the beams.
Connect the vinyl hose to the other side of the adapter.
Connect the vinyl hose to the solenoid.
Connect the air supply to the solenoid.
Drill a 4 inch hole in the back of the shell with a hole saw.
Connect the 4 inch blower to the housing.
Connect the 4 inch dryer hose to the back of the blower.
Empty the hose outside the building.
My laser is in a concrete building and no place near the laser has penetrated outside except for a door with a mail slot.
I decided to take a register adapter for the pipe on the wall and I cut it to fit the mail slot.
In my case, my hairdryer has a lip on the suction side.
I drilled 4 holes on this lip, put the lip into the newly drilled hole, and fixed 4 screws on the shell through the lip.
Then I sealed any gaps with silicone.
Connect the Hobby CNC to the computer using a straight-through parallel cable.
Install Linkmotion software from Solustan.
Install Corel Draw or similar.
Install 26 × 2 × X pieces of plywood on the left and right upper edges of the shell.
Take a manual router and use the rabbet router bit to rabbet on a small edge at the top of the chassis.
The Edge will provide a sealed lip for the polycarbonate lid.
Measure the size of the top of the shell lip.
Cut the polycarbonate into this size.
Place a piece of polycarbonate on top of the shell.
It should not fit due to the circular edge created by the router.
Mark the polycarbonate part that highlights the lip edge of the shell.
Remove polycarbonate with a roller or hacksaw and cut off the protruding part.
Polish the edge of the cutting edge with a palm sander with medium sandpaper.
Polish all the edges of the polycarbonate to prevent paper cutting.
After using the router, you may have to re-align the beam because the intense vibration of the router may have shifted the mirror.
Clean up all the pieces of wood and plastic.
Install the hinge on the shell.
Peel the protective cover off the polycarbonate and place it on the top of the shell.
Mark the position of the screw hole from the pc hinge.
Connect the polyester on the hinge.
Connect something creative to the pc as a handle to lift the pc door.
Cover the float with tin paper.
Put a piece of 3/16 acrylic on the floating table.
Measure the distance between the laser head and the floating table.
If you buy a shot with 2.
5 inch focal length, set the distance between the laser head and 3/16 pieces of acrylic to 2 using a threaded bar. 5 inches.
Make sure the floating table is horizontal with the XY table.
Wear safety glasses.
Power supply for blower, forced air supply, amateur CNC, water pump and laser power supply.
Cut out all parts of the containing file with Corel Draw or similar tools.
Turn off all power.
Follow the instructions above to rebuild the laser head with the new part.
Rotate a screw bar on the floating table so that the bearing comes out of the bracket.
Unscrew one of the nuts and remove the ball bearing.
Rotate the remaining nuts 1 inch.
Put a 5/16 Fender washer, a plastic gear that has just been cut off, another Fender washer, a nut, a ball bearing and a final nut together.
The final nut should be flush with the bottom of the screw bar.
Rotate all other nuts to lock the bearings and plastic gears in place. Tighten well.
Rotate the screw bar to keep the floating table horizontal.
Repeat the other 3 rebar bars.
Take the electric switch zipper and wrap it around all 4 plastic gears.
Pull the chain tight.
Make sure the chain sits on the gear of the gear.
Mark the point where the end of the chain meets the middle of the chain.
Remove the chain, cut 1 ball in advance, and give you 1 loose ball on the chain.
Take a straight blade and find the seam on the last ball of the chain.
Press the seam hard and slide the razor into the ball.
This is a very difficult process and requires a lot of attempts, but it is entirely possible.
You may want to wear gloves because you may cut yourself.
Slide another blade next to the first one to expand the gap of the ball.
Pull the two razors open the ball.
Crush the last ball on the other side of the chain with pliers.
Find the link in the crushed ball.
Discard the crushed ball and place the link on the other side of the chain at the split ball.
Close the separated ball with pliers.
You should have a complete endless chain now.
Rotate the screw bar of the floating table to make the float at half high.
Lift the floating table so that the ball bearing comes out of the board at the bottom.
Slide the ball chain around each screw bar.
Realign the floating table bearing to bring the bearing back into the hole.
Rotate the threaded rod to make the Workbench horizontal relative to the XY workbench.
Place the ball chain on All 4 gears.
This can be a bit difficult for the top Fender washer.
Feel free to undo a top nut on the screw bar to allow unrestricted access to the plastic gear.
If there is slack in the chain, use the sliding door bearing and place it between the two left threaded bars.
Tighten the bearing against the chain.
Take a drywall screw and screw through the bearing.
Place a nut on the top of the screw bar and rotate it about inches.
Place a ball bearing on the top of the nut.
Rotate another nut and lock the bearing in place.
Tighten two nuts.
Repeat other rebar bars.
You can now pull the ball chain left and right to lift and lower the table.
Find a clever way to connect the entrance door to the front of the shell.
I used two handles with bolts on them and threaded insert adapter.
If you do it here and follow my instructions, you should now have a fully functional laser cutter.
Congrats.
Custom message
Related Products